TIP15: CORE 101-2

The first“CORE”  tip I gave was that the “CORE” needs to be “STABLE” in order to functionally use our body/muscle systems.

Today I will show you WHY & HOW we create a stable “CORE”.

When we say “stable core” it really means creating enough pressure in our core region so our body (in this case, our spine) doesn’t break like a twig when we face a large external force.  (This is the primary “WHY”)


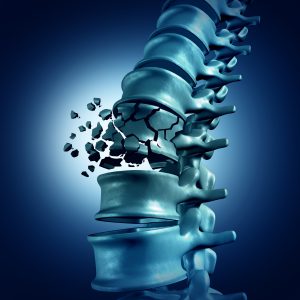
(Don’t worry, this doesn’t happen easily)


Have you seen weight lifters with a huge belt around their core when they squat with heavy weight???

http://leanmuscleproject.com/weight-lifting-belt/

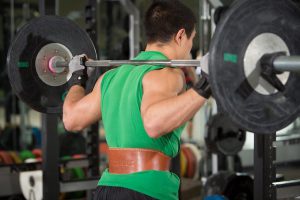
That belt, used to protect you from potential damage, assists you to create that pressure.

This is called, “internal abdominal pressure”  

which is,,

EXACTLY the “CORE UNIT”s job!!!

That’s what the “CORE UNIT” does, it protects.

If the “CORE” muscles are working properly, that means the “core region” is stabilized (ready for high demand).

Now, you might think having a strong core is unnecessary for you because you may have no intention in squatting 200lbs.

I will prove you wrong tomorrow.

I will convince you why it is necessary for you to want your “CORE” to be working optimally.


TIP13: Good Posture.

What do you imagine when you think of “Good Posture”?

You may think of a particular person, a healthy looking individual, or some imaginary being.

Now, how would you explain what  “Good Posture” is??

The answer to this is that there is no one definition of 
“Good Posture”.

What people think as  “Good Posture” can change over time, and also can be influenced by cultural expectations.

Even health professionals change their version of the definition of  “Good Posture” all the time (as they become more knowledgeable).

I’m not writing this to make you confused.

I’m writing this because I want you to start to “feel” things rather than trying to imitate what you see or what people have told you.

“Good posture” in my sense is when you feel the most “Natural”.

When you feel “right”, or “comfortable”.

When you don’t feel any muscles working harder than others.
You need to know how to create this situation with your own body.

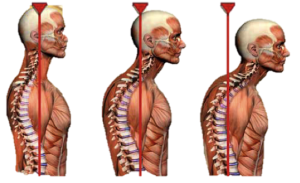
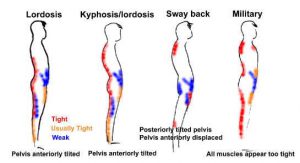
These are all examples of imbalanced muscle use.
The red areas are the overused muscles associated with the indicated posture.

Which of your muscles generally tend to get tight?


Now, let’s try to recreate a “Natural Posture”.


HINT1: Start by imagining where your center of gravity is.
You can figure that out by imagining how heavy each body part may be.

HINT2: The further you move away from the center of the earth, heavy objects become more unstable if they are “off-centered”.

Can you apply these ideas to your body in order to create
 “Good Posture”?  I think so.

Play around with leaning in one direction, or lifting your arm, moving you head positions to change the center of gravity of your body.

Feel.

Feel where tension may increase and decrease.

Having trouble finding the sweet spot?

Always get stuck fitting the last piece of the puzzle??

That is YOUR unique area you need to work on.


TIP12: Pelvis 201 The Pelvic Tilt

Before we jump in what the “Pelvic Tilt” is,,,

Please note that what I want you to get out of today’s tip is what the “consequences” of these tilted positions (for a prolonged time) are.

You might already know what a “Pelvic Tilt” is, or mean, but the significance of it and how it affects the whole body continues to be a hot topic among health/ fitness professionals.

Below is is a side view of a super simplified description what a “Pelvic Tilt” looks like.

Left: Posterior Pelvic Tilt

Centre: Neutral Pelvis

Right: Anterior Pelvic Tilt


You can see, how the angle of the Pelvis, influences the curvature of the spine.   (Consequence 1)

Usually, we all have a tendency to fall into either anterior or posterior tilt.

Now, imagine yourself in countryside Africa, having to carry a load on top of your head.

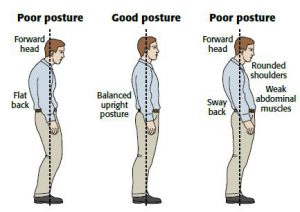
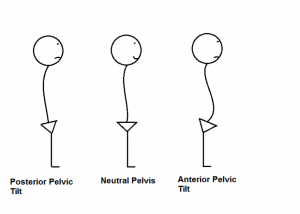
You might have never tried this, but you can imagine.


Now, go back to the first image and think which pelvic angle you would want to have in this situation.

Which angle looks suitable and the least damaging??

Now, we are fortunate enough to live in a world where we rarely encounter this type of situation, but we still need to keep in mind our “head” is as heavy as a “bowling ball”.

You need to know the BIG advantage of maintaining a neutral pelvis for your postural health and vice versa.

The more you spend time in a tilted pelvic position, the more your core muscles become weaker to maintain neutral pelvis poison and the more you will face issues along the spine (low back, mid back, upper back, and neck,,,, sound familiar??) (Consequence2)
In addition, your posture-related muscles adapt to whatever posture you are in the most, creating many muscular imbalances throughout the body.  (Consequence3)

This is no exception with sitting.

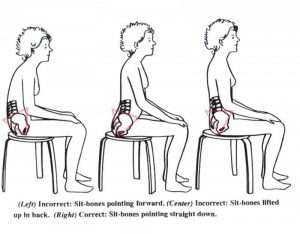
You may say “it is so hard to maintain a good sitting posture for long “.

You are absolutely right.   Us humans weren’t designed to sit for prolonged periods of time, of course, it’s difficult!!

What you can start from today is to start observing yourself.
This first step is to become aware how much time you may be spending in a tilted pelvic poison.


TIP11: Pelvis 101-4

Hopefully, today’s tip will make you start thinking of the reasons why maintaining a good Pelvis health profile is crucial to prevent many common chronic problems people face today.

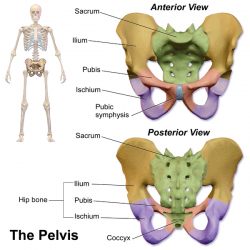
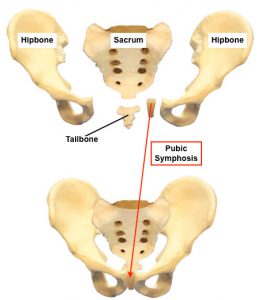
Start thinking how this durable structure (Pelvis) could become compromised by what we may be doing daily and constantly, adding more pressure to those weak links (SI Joints).

So, we already talked about how the strong structure of the pelvis has the ability to comfortably tolerate our upper body weight.  →read Pelvis 101-3

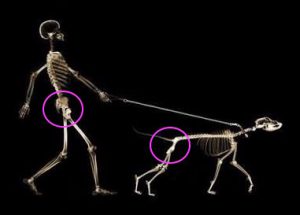
You can see in this picture how the pelvis of humans are much bigger (stronger looking) compared to that from a four-legged animal, in which the pelvis is NOT responsible for doing much of the weight bearing.


So far, we’ve talked about how TOUGH our Pelvis is designed (or “evolved” should I say), and how it would never “fail” us.
(*I am excluding, of course, cases when we encounter strong external forces, like in an accident)

Let’s just say, this is true in a sense, but it’s all theoretical.

This is what you learn from textbooks
(that’s why I titled it 101).


Now that you have some knowledge what happens in the
ideal world, (theoretically speaking),
let’s start applying it to the REAL world.

What is happening in REAL life

What happens when we take full advantage of things without knowing the consequences?
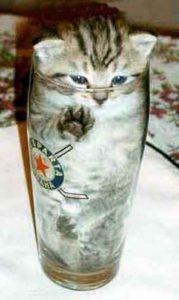
Yet, what if we don’t even realize we are taking advantage of something until facing the consequences?

“Only one time won’t hurt me”, right??

Because if you knew the consequences (a negative one) in the first place, you would probably try to avoid it, right?


What am I referring to?


When I say, the pelvis is so tough it won’t fail us?

I mean,

the body will do whatever, everything and anything to maintain that strong pelvic structure.

It is happening “daily” in many forms and you just might not be aware of it.

So let’s make the “unknown”→”known”, so you can predict the outcomes of your actions.

The next pelvis series we move on to 201s.

You will learn “what” affects the health profile of the Pelvis.

Stay tuned.


TIP10: Pelvis 101-3

If you haven’t read the previous Pelvis 101 series,
here’s the link: Pelvis 101-1   Pelvis 101-2

We talked about the bones and conjunctions within the pelvis, and today let’s learn about the durability of the pelvis using a metaphor.


Imagine you broke your favorite cup, but you managed
to tape it back together.


Then, you put a cat in that cup ♡


Soooo cute♡
Okay,  so the cup didn’t break!

Let’s put another one in.

Awwwww♡


Didn’t break.  Good.
Then maybe another one♡


So adorable!

Now though, you start getting worried the glass may break anytime and tense up a little.


If that glass would to break again, you probably have and idea “how” or “where” that would happen.

You guessed right.

As we add more weight to the glass by adding more kittens, eventually the sections where you taped would snap.

Even if the tape doesn’t snap, I think you would agree that adding more weight to that glass would definitely add more pressure to the tape.


Now back to the Pelvis.

This time, the taped up junctions are our SI Joints at the back of your pelvis, and it looks like this.

The “Ligaments” are a strong fibrous structure that holds the joints together from separating.


In the SI Joints, ligaments also protect the front side of the joint for extra stability! Yay!


Now, the “weight” added in this case is our upper body weight.

I don’t know how much you weigh, but upper body weight is no joke.    Head, chest, arms, internal organs…  It’s heavy.

The pelvis has been carrying our upper body weight all our lives, but we just don’t give enough credit, do we?

The pelvic bones, as well as the ligaments protecting the SI joints, are so so strong, they will never break on us, or snap open on us.

Having said that,

Tomorrow, I will talk about why it is so prevalent today for people to come in with “SI issues”, or “Hip problems”, or “chronic back issues”, or even “frozen shoulders”.


TIP9: The Pelvis 101-2

Today, let’s talk about the structure of the pelvis.

I’m not going into much detail because if you’re interested, you can always ask Mr. google and hit a million websites that will describe it in the depth of your dreams.

Here, we only discuss what “I,” think “YOU” should know.

So, the pelvis.


During the early stage of our life (i.e. kids), the different colors parts described in the picture used to be separate bones.

Then, at puberty, the Ilium, Pubis, and Ischium all FUSE together and left with a less complicated structure.

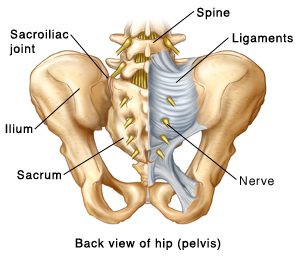
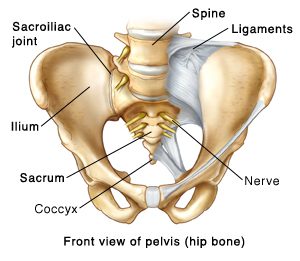
As adults, we are left with a set of Hipbones, a Sacrum, tailbone, and a cartilage (Pubic Symphysis) at the front.

If anything could go wrong in the pelvis, it’s usually related to conjunctions in the front (Pubis Symphysis) or the back (SI Joint).

I’ll tell you why tomorrow.


TIP8: The Pelvis 101-1

Have you ever taken the time to think thoroughly about the pelvis being a key feature in the human body??

In fact, it, in my opinion, it might be the most important feature in our body which could potentially affect EVERYTHING happening in our body.

The structural and functional health of the pelvic region needs to receive more attention from absolutely everyone who wishes to be athletic, active or chronic pain-free in general.

This is what the pelvis looks like.

There are many features of the pelvis which I won’t touch on today (keep posted), but at this point, I just want you to notice and recognize the Pelvis is what connects the lower body to the upper body.  (and affects both lower & upper body function)

Every realm of the fitness world have their own opinion where the lower body ends and the upper body start, or what is included in the “CORE”.

To keep it simple, just know your lower body & upper body performance are both dependants on the status of your pelvic region. 

I don’t think anyone will argue with that.

Stay tuned for my Pelvis series.

You will not regret it.


TIP5: Unravel Upper Body Tightness


Neck, Shoulders, Upper back, Mid back, Lower back

X

Tension, Stiffness, Tightness, and Pain

Do you experience any of these combination on a regular basis???

If so, and you know it’s not from an accident or a direct trauma to that region,

you will most likely benefit from learning how and where your upper body (Trunk, Arms, and Head) should be positioned.

The first step is to know (and believe) that if your upper body is stacked on top of your lower body, you will no longer have to deal with the tightness you have been experiencing.


But, why do so many of us have this problem?

It’s because we have the ability to do this. ↓↓

We have the ability to balance (in this case, in a bad way)

Our innate goal as a living human being is to “stand” not to “stand in a good posture”.

But you know, there is a trade-off.
Standing with poor posture forces the body to overuse, and tense many many muscles that should be at rest with good posture!

For now, let’s start by noticing.

Noticing that if your upper body is not positioned (stacked)  on top of your lower body, the result is you are more likely to experience unnecessary upper body tightness.


TIP1: Stacking

The concept of stacking.

Did you know?  The more you get better at stacking YOUR body (when standing or sitting), you’ll experience less and less tension in those specific muscles or joints you unconsciously tend to depend on (or, overuse).

How to stack??
Start by imagining the top of your head pulled from above by one string.
Still feel tension or discomfort anywhere??
Neck? Shoulders? Upper back? Lower back? Hips? Thighs? Knees? Calf? Foot???
Those are the EXACT areas YOU will need to work on!